Screen printing is widely used across a great many industries for cost-effectiveness, vivid printing, and other good features. And it is the most common solution for private labeling. That is to say, it can add custom logos or designs to your products or packaging for differentiation.

There are 2 ways for screen printing: manual and automatic. Either way, the fundamental working process is the same. Follow me to have a look. And you can navigate to related content via the below links.

Screen Printing Process Step by Step (5 Simple Stages)

Simply speaking, screen + ink + squeegee = screen printing. It’s basically to create a stencil on a screen and then push ink through, which can transfer a design to the object’s surface beneath. Here I list 5 simple steps to help you better understand how it works.

Step 1: Create designs or patterns.

Begin with an original image, that is, what you want to print on products. Then, clearly present layer images of each color and the printing order if there’s more than one color. That directly influences the rendering effect. Although some artistic creations can be done through multi-color synchronous silk screen printing, yet that does not work in practice.

Take T-shirt screen printing for example. You need to choose a plain, clean T-shirt and employ the computer to start graphic designs.

Screen printing Step 1- Create designs or patterns

Images (step1-4) are all from wikiHow.

Step 2: Make a screen plate.

The screen plate consists of a frame and mesh. The aluminum frame is common for its convenience to operate and hardness to deform. Chemical fiber mesh can meet the general demand. For high-precision patterns, it is advisable to use metal mesh made of stainless steel.

Once materials are confirmed, all we need do is to lay out the frame onto a screen and staple it tightly. A screen is for one color. In other words, multiple colors require more screens.

Screen printing step 2 - Make screen plate

Step 3: Coat emulsion and expose it to light to obtain a stencil.

Find a completely dark room and then coat the screen with a screen printing emulsion. After drying, use the transparent acetate film with a design created in step 1 for exposure. You can understand the “film” as a photo film. The only difference is a photograph paper changed to the emulsion-coated mesh screen here.

Under the bright light, the emulsion will harden and develop. After that, wash away unhardened emulsion on the film’s black area. A clear pattern appears on the screen. So far, a stencil is created.

Screen printing step 3 - Coat emulsion and expose it to light to obtain a stencil

Step 4: Ink up and print the design on the product.

Put the object on a printing board, below the screen. Be sure to line up the stencil on the object correctly. Only in this way can we make designed patterns aligned in the right manner.

Afterward, pour the desired color ink on the screen top. Apply the squeegee to evenly pull the ink down until the entire design is covered. The ink goes through the stencil. A thin and even layer of ink is left on the object’s surface. That is to say, print a pattern designed in step 1.

Screen printing step 4 - Ink up and Print the Design on the Product

Step 5: Dry and clean the screen for reuse.

Place the printed product in a clean area. Dry it up using a dryer. This helps ensure screen prints would not wash out or fade away. Then obtain the final products.

Remember to utilize a special washing fluid to wash the emulsion away. Then reuse it to create a new stencil.

Screen Printing on Fabric (Custom T-shirt Example)

In the garment industry, it is common to use screen printing techniques. Although in theory, screen printing applies to all fabrics, it works best on natural fabrics in practice. The most ideal fabric is cotton.

Based on the used screen-printing presses, we can classify screen printing into different types. The 2 most common are,

  • flat-bed screen printing — suitable for ready-made products like T-shirts with simple prints.
  • rotary screen printing — suitable for entire rolls of fabric printing.

Either way, the basic process is the same. In other words, the above-mentioned 5 steps are applicable to screen printing on fabric.

Take our company’s cultural shirt for example.

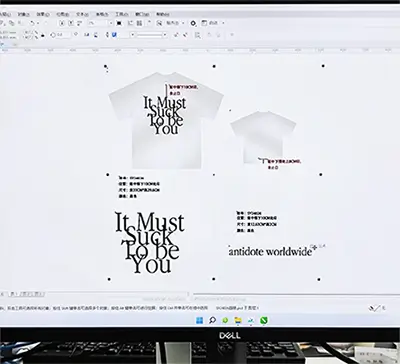
At first, we created several Jingsourcing logo designs. After getting the results of all colleagues’ preferences, we chose the following for silk screen logo printing.

logo design for screen printing on Jingsourcing Cultural T-shirt

With T-shirt samples bought from Hangzhou, Zhejiang Province, we started to find clothing manufacturers for screen printing. Thanks to the long-term cooperative relationship, we found some factories to do that, although our quantity is far less than their printing MOQ

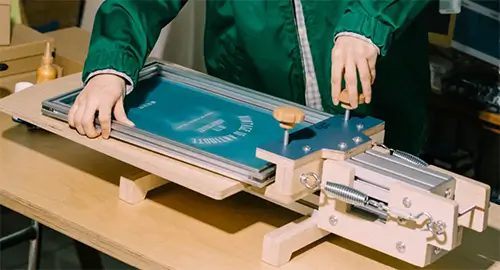
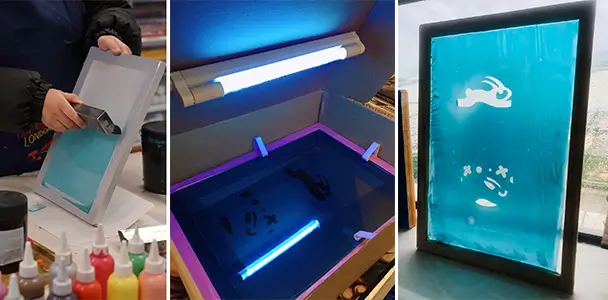
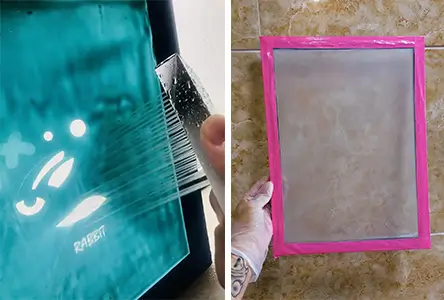
Before the start of printing, the factory created a printing mold (step 2 alike), then coated the emulsion and exposed it to light, and ink up (Step 3, 4 alike).

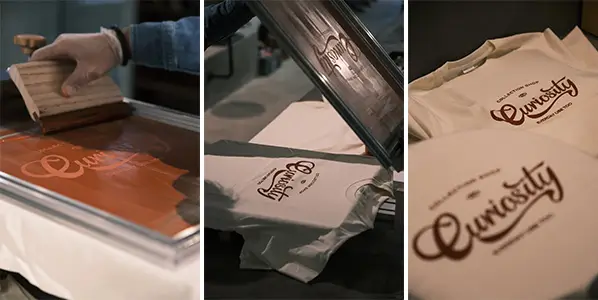
It is worth mentioning that we did some tests on the two logo colors: white and orange, to see whether the ink color is OK. Once confirmed, start printing and then dry.

Screen_Printing on t shirt

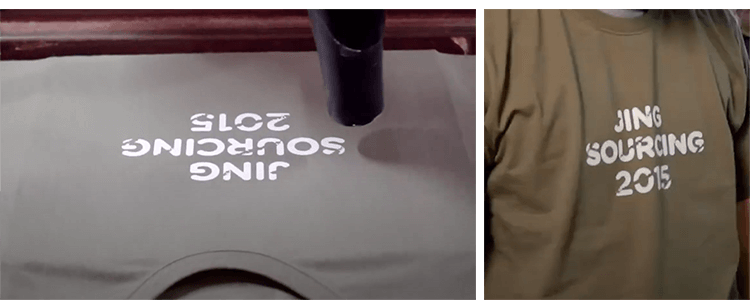
By screen printing, we customize T-shirts at a good price. Most importantly, these corporate cultural T-shirts look the same as the brand sold in the mall, and all our colleagues like to wear them.

Jingsouring can help you screen print products for customization

Screen Printing VS Digital Printing (In Garment Industry)

With the technical advance, digital printing, hereinafter referred to as DTG, becomes popular. And it’s a common method for fabric printing as well.

Still take T-shirt printing for example. Which is better, screen printing or DTG? Actually, this is up to your order quantity and the complexity of pattern design and style.

  • Screen printing is best if your order is large and the design is simple. The MOQ is 500 pcs/item.
  • Otherwise, DTG is suitable, as one piece can be printed. And it’s eco-friendly in comparison to screen printing, in keeping with the call for environmental protection.

Here I sum up the difference between screen printing and DTG for your better understanding.

Screen Printing

  • Good for simple design (four colors at most for good printing effects).
  • Design patterns that can be divided into layer images of each color.
  • With a 3D look and feel.
  • Make a screen and create a stencil.
  • More time consumed.
  • Suitable for large quantities.
  • Cheaper bulk production. Though labor cost rises as one color requires a screen, yet it’s been used for design reproduction many times.
  • Soft hand, only limited to water prints & discharge prints.
  • Long-lasting and durable.
  • Less environmentally friendly.

Digital Printing

  • Well adapted for fine patterns with high detail designs. Easy to print many colors.
  • Designed patterns without requirements.
  • Much cleaner, with brighter colors.
  • No screens as it’s directly printed.
  • Quicker printing.
  • Better suitable for a small batch.
  • High initial investment due to equipment and ink costs, but a flat fee per T-shirt regardless of numerous colors.
  • More soft hand feel, without coating feeling in general.
  • No fading when rubbing or washing.
  • Eco-friendly.

As you can see, both have advantages and disadvantages. Choose the right one according to your needs. If still confused, welcome to turn to Jingsourcing’s experts for help.

Screen Printing VS Heat Transfer (In Garment Industry)

Heat transfer is best if you want to print gradient color logos or designs. But keep in mind that heat press printing has a temperature requirement of 140℃ – 180℃. Besides that, there exist other differences between heat transfer and screen printing. Let’s look at the below summary.

Screen Printing

  • Applied to almost all kinds of materials, ideally to cotton fabrics.
  • Good for simple design and few colors, unable to print gradient color.
  • More durable, longer-lasting.
  • More suitable for dark-colored fabrics.
  • Cheaper.
  • Suitable for large quantities.
  • Pollute the environment.

Heat Transfer

  • Mainly applied to chemical fibers, with some limits to materials.
  • Suitable for complex, detailed designs & multi-colors, especially gradient colors.
  • Less durable and easy to fade.
  • Better for light-colored fabrics.
  • Expensive.
  • Preferred by small batches.
  • Involves fewer chemicals.

Which one is better? It depends on the situation, just like many questions we encountered in daily life. If you are still unclear, Jingsourcing’s experts are always here to support you.

Screen Printing VS Embroidery (In Garment Industry)

Aside from screen printing, embroidery is also a good solution to add logos on fabric-made products. What’s the difference? Let’s go on reading.

Screen Printing

  • Good for a simple design.
  • Less 3D look as logos is screen printed on the surface of the fabric.
  • Less costly, especially cheaper to print designs in bulk and with a single color.
  • More colors mean the cost increase, as each new color requires a screen.
  • Less durable as it’s printed on the surface of the fabric.
  • Better for thin or lightweight garments like T-shirts and hoodies.

Embroidery

  • Appropriate for very intricate designs.
  • Enhanced 3D look and higher quality compared to screen-printed logos.
  • Kind of expensive, especially costly when the printing area is large.
  • Flat fees or priced by the stitch count other than the number of colors.
  • Longer lasting as it’s stitched straight to fabric, no color fading issues.
  • More suitable for heavier garments like polo shirts and caps.

Both have pros and cons. When making a choice, you should consider 5 key factors: the specific product to be customized, the number of colors, the printing area, the quality and quantity of apparel, plus your budget.

Types of Screen Printing

Whether in the past or the present, people widely use the silk screen printing technique due to its applications to almost all kinds of materials. According to the materials to be printed, we can divide it into different types: fabric printing, plastic printing, ceramic printing, glass printing, circuit board printing, metal printing, etc.

Let’s focus on fabric printing. As shared by T-shirt printing manufacturers, there’re 6 different types of screen-printing methods: spot color screen printing, halftone printing, grayscale printing, duotone printing, CMYK (4-color) printing, and simulated process printing. Here I explain 3 popular types.

1. Spot color screen printing

Most common and easiest. With the help of pe-mixed specific color inks, it’s often used to print high-density colors such as white, dark black, and fluorescent colors.

Note: it’s not mixed by 4 colors, as each spot color requires special plate printing. In this way, the accuracy of color transfer is ensured.

2. Grayscale printing

Reproduce color images in gray shades from black and white. It stands out due to the low print cost, as no additional colors are used. Don’t worry about the image quality. It’s still high, but the color is either light gray or dark gray.

3. Halftone printing

Essentially use one-color ink to create various shades (from light to dark) and print images. The creation of seemingly different colors requires the use of different size dots, which are tiny and hard to perceive from further away. With the enhanced layering of printed images, halftone printing is suitable for multi-color T-shirts.

Besides, we can also classify screen printing by inks, which have a direct influence. In other words, each type of ink means a kind of screen printing.

Here we just concentrate on the most used 3 types: plastisol, discharge, and water-based inks. The latter two deliver softer prints, also known as “Soft-hand Screen Printing”. That’s a perfect fit if you want to print clothing with a softer touch and a higher-end look.

A Final Takeaway

We hope you learn something new or enjoy refreshing your understanding of screen printing, either process, common types, or its comparison with digital printing, heat transfer, and embroidery. Should you have any further questions, leave a comment below.

Our Jingsourcing expert starts with understanding your needs. Then, help you choose the right solution to differentiate your products. Years of sourcing experience in China ensure our professionalism and flexibility. Directly tell us your ideas. We’ll help you with the rest.

0 0 votes
RATING