Table of Contents
- What is injection molding process?
- Injection molding components in the molding process.
- General injection molding process in 4 steps.
- Custom injection molding process.
- Plastic injection molding process & case sharing.
- Injection molding process cycle and how to reduce cycle time.
- Common defects in the injection molding process (causes & remedy).
What is injection molding process?
The injection molding process is a way to produce parts in large volumes. This process needs the injection molding machine, raw materials like plastic, rubber, and metal. Though there are many types of injection molding, the general process is almost the same.
And the simple injection moulding process is to put the raw materials into the machine, melt materials and inject the melted material into the mold. In the end, parts cool and solidify into the shape you need.
Before we learn the injection molding process step by step, I’ll introduce the injection molding machine components involved in the process. So you can better understand the specific process. An injection molding machine mainly consists of clamping unit and injection unit, as shown below.
Injection molding components in the molding process
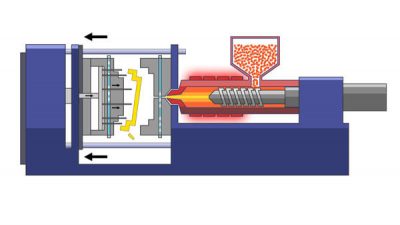
Injection unit
The injection unit includes a hopper, a reciprocating screw, a barrel, and a heater. It is responsible for heating the material in the barrel after putting the plastic granules into the hopper and then injecting the molten material into a mold through the nozzle by a reciprocating screw. And the screw won’t retract until the part in the mold solidifies. After that, the screw fills the mold for the next shot.

Source: Wikipedia
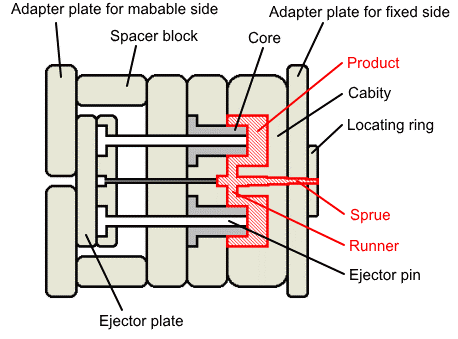
Clamping unit
Clamping parts include a nozzle, a cavity, a mold, and a movable platen. And the first step of injection molding process is clamping. In other words, closing the two halves of the mold.
Both halves are fixed to large plates in the movable and fixed sides. After sufficient cooling time and the part has solidified into the shape you want, the mold opens and ejects the part out of the mold.
Again the mold closes and the mold fills with the molten material injected by the reciprocating screw.
Source: 3D SYSTEMS
General injection moulding process
1. Clamping
We also call the first step “clamping”, “closing the mold”. Before putting the raw materials into the injection molding machine, two halves of the mold are closed together tightly by a clamping unit. And they will keep closed until the part solidifies into the shape you want.

Images (step1-4) are all from Aire Plastics.
2. Injection
The injection unit injects the melted material into the mold through a runner and fills it. At the same time the air inside escapes through vents. During this whole process, heat and pressure are very important.

3. Cooling
This step involves the molten material cooling and solidifying into the part you desired inside the mold. As the mold designers have designed the internal cooling lines for the mold. And the cooling system is well designed because it determines the cooling time which directly decides the length of the whole manufacturing process.

4. Ejection
After sufficient time, the mold opens, and the ejection system injects the fully cooled part out of the mould. Because the part may shrink and stick to the mold, enough force must inject into it. Once the ejection action is finished, the mold is closed again, and the next injection molding process begins.
The four steps shown above are the general injection molding process. In fact, the practical manufacturing process may be a little bit different.
For instance, if you manufacture parts with two times of the whole process above, it is called overmolding. This type of injeciton molding process is also known as two-shot molding. As more than one component is molded layer after layer to make a solid part in the end.
Let’s take manufacturing an iPhone case for example.
You need to mold a plastic layer in four steps firstly, and then a top rubber layer in four steps too.

Insert molding is another common injection molding process type. Put inserts into the mold, and then start inejction molding from step 1 to 4 above. Inserts can be any non-plastic parts. For example, when you produce a USB cable connector, the first thing is to put the iron part in the mold, and then carry on the four steps.
The four steps shown above are the general injection molding process when you have the ready molds, for example, the factory you choose has the exact mold you need. However, if you want to produce a totally new product, custom injection molding will be a good choice.
Custom injection molding process
Custom injection moulding process includes one more step: injection molding design complared with general injection molding process, which is the initial step before the injection molding machine starts to work. It consists of part design and mold design. Since a good design of products and molds can provide you with high-quality products. Without it, you may make processing mistakes and lose a lot of money.
Injection part design
If you want to produce a new kind of part or product, the first step is to get a drawing of the product design. If you have product pictures or your designers have finished the drawings of the product design, that’s couldn’t be better.
But if you only have an idea and have no reliable designers, you need to ask the professional designer team to help you to visualize your thoughts and ideas.
Injection mold design
After you know the product you want to produce, then you can design the mold. As we know you have to take the finished part out of the mold after it solidifies, you have to design the part in two halves. And the mold must be durable, so the material of the mold should be steel, aluminum, and another strong one.
Moreover, the mold design is not that cheap, and it can take a long time to finish. So you have to consider whether the injection molding is suitable for you or not.
Plastic injection molding process
I mention plastic injection molding process alone because it is the most widely used manufacturing method and also the origin of injection molding. So many people regard injection molding as plastic injection molding. Its molding process is the same as the general injection molding process but the materials. The common materials are shown below. For further material information, please read the post: what is injection molding.
- acrylic (PMMA)
- acrylonitrile butadiene styrene (ABS)
- nylon polyamide (PA)
- polycarbonate (PC)
- polyethyelene (PE)
- polyoxymethylene (POM)
- polypropylene (PP)
- polystyrene (PS)
- thermoplastic elastomer (TPE)
- thermoplastic polyurethane (TPU)
Custom plastic injection molding case sharing
One of my clients orders 500000 pcs of PET milk teacups. The client offers a picture of the product. We find a reliable factory which has long-term cooperation with us and finish mold design. After the client thinks the design is OK, we start to design and make the new mold and produce cups with the designated logo. The mold cost is about $9,375. The labor and the material cost is about $87,120. The total cost is $96,495.
Note: This picture is not our customer’s product, just for reference.

Injection molding process cycle & how to reduce cycle time
The injection molding cycle is the whole injection molding process. The injection moulding cycle time is pretty short which depends on the machine power and shot size, usually between 1s and 2mins. Here is the formula of Injection moulding.
Injection moulding cycle time formula
- T = td + ti + tc
- T: injection molding cycle time
- td: intermediate time
- ti: injection time
- tc: cooling time
Intermediate time
Intermediate time = Time to close a mold+Time to open a mold + Time to eject the part + Time to place the mold + Time to apply parting agent.
Besides, Time to open a mold + Time to close a mold = Dry cycle time
The improvements in injection molding machinery shorten the intermediate time. And the molded parts can release by themselves.
Injection time
This is an injection time formula.
- TI*RI=CV
- TI: Injection time
- RI: Injection rate(cm3/sec)
- CV: Cavity volume (cm3)
So if you want to calculate the injection time, you need to know the injection rate and the cavity volume. While many factors may influence the injection rate like the injection speed controls, molding conditions, cavity wall thickness, and so on. And the injection rate is 15-25cm3/sec per ounce( according to TORAY) using the screw injection machine.
You can estimate the volume by the size of the mold. Then you’ll get the rough injection time.
Injection molding cooling time
Generally, the cooling time is the longest in the injection molding cycle time. And many factors affect the cooling time as below.
- Injection material
- Mold cooling design
- Mold material
- Part design: wall thickness
How to reduce the injection molding time
Since time is money, reducing this part will save money by manufacturing more parts with less time. So it’s important to reduce the injection molding time and speed up the molding process.
1. Thinner wall thickness of the molded part
A thinner wall means less injection time in the molding cycle time. Because the thick one needs more time to melt and fill the mold.
2. Material type
The characteristics of the injection molding material can importantly affect the injection cycle time. Some material doesn’t solidify as quickly as others. We all know that the cooling time is the longest part, so reducing this part can be a good choice. And it will directly influence the injection molding cycle time.
3. Mold material
Like the injection molding material, the injection molding mold material also influences the molding cycle time. Though steel is the common mold material, other highly-conductive metals like aluminum will be used as inserts within the mold to take the heat quickly from the solidifying part.
4. Cooling design
Designing the cooling lines that allow water or air to run through the steel mold cooling the molded products is a good choice. What’s more, to minimize the molding cycle, you can use the cooling lines by changing the water temperatures, flow rates, or the cooling design system.
All in all, you need to consider all factors of keeping cycle time low. And it means you can produce more products in less time. Furthermore, the accurate estimation molding cycle time helps you to predict the production timelines and injection molding costs.
Injection molding defects caused in the process
There can be a lot of molding defects during the injection molding process. Sometimes you can avoid the defects by adjusting the pressure or temperature of your mold.
Flow lines
Flow lines are shown as below. And the flow lines often have a wavy pattern in a different color. They generally appear near the gate of the mold. This kind of defect may be unacceptable if the customer finds it.

Source: creativemechanisms
Causes
The molten plastic changes its speed when it changes direction or flows through different wall thicknesses may cause the flow lines once solidify.
Remedies
- Increase pressure, temperature, and injection speed to make sure the material doesn’t solidify before the mold is full.
- Try to use more round corners when you design the molds to avoid the sudden direction changes that slow the flowing molten material.
- Locate the mold gates near the thin wall and leave some distance for two gates when you design molds.
- Make a bigger injection nozzle to raise the flow rate and avoid early cooling.
Sink marks
Sink marks are shown above. They typically appear in the thick place. The effect looks like erosion but is caused by the inner shrinkage of the products instead.

Source: TOPWORKS
Causes
When there is not enough cooling time or cure time for the part, especially the thick sections as longer time is needed in that situation, the sink marks may appear. Moreover, the low cavity pressure and the too-high gate temperature can also be the causes of the defects.
Remedies
Higher pressure, lower temperature, and longer cooling time to allow the part to sufficiently cool. Design molds with a thin wall for easy cooling.
Vacuum voids
There are air bubbles in the finished parts. Though small and few ones do no harm to the product quality, the big and numerous ones will weaken the part to some extent.

Source: ecomolding
Causes
The pressure is not high enough to push the air out of the mold. Furthermore, a sudden cooling of the part surface in the mold, while the molten material inside is pulled outwards in this situation can be a cause. Generally, the thicker the wall of the product is, the more easily you will get voids.
Remedies
- Increase the pressure to force the air out.
- Design the mold with a wall thickness less than 6mm.
- Choose the injection molding material with a characteristic of low viscosity.
- Lower the mold temperature.
- The mold gate should be well designed to prevent the air from in.
Conclusion
As you have learned above, injection molding process is complicated. if you need to make a new mold, it will be time-consuming and costly. In real business, you should think all aspects of the process before developing a brand new product.
If you need any injection molding products, please contact us. As the best sourcing company in China, we Jingsourcing can offer you custom products design, find reliable factories with competitive prices, follow up production, ensure high-quality products, ship and deliver the products to your door.